
Learn how to make a rug with these easy DIY steps. Choose your materials, design and get creative to add a personal touch to any room.
Making a rug can be a daunting task, but it is also one that can bring immense satisfaction. Whether you are an experienced crafter or just starting out, there are certain things to keep in mind when creating a rug that will not only make the process easier but also ensure a beautiful end product. From selecting the right materials and tools to choosing the perfect design, every step is crucial in achieving a rug that you can proudly display in your home. So, let’s dive into the world of rug making and discover some tips and tricks that will help you create a masterpiece.
Daftar Isi
The Art of Rug Making: A Comprehensive Guide
Introduction
Rug making has been a traditional craft for centuries. It is a beautiful and practical way to add warmth, texture, and style to any room. Making a rug may seem daunting, but with the right materials and instructions, it can be a rewarding and enjoyable experience. This article will guide you through the process of making a rug from start to finish.
Choosing Your Material
The first step in making a rug is choosing your material. There are many options available, including wool, cotton, jute, and synthetic fibers. Wool is a popular choice for its durability and softness. Cotton is another great option for those looking for a more affordable alternative. Jute is a natural fiber that gives a rustic look to your rug, while synthetic fibers are easy to clean and maintain.
Preparing Your Material
Once you have chosen your material, it is time to prepare it for rug making. If you are using wool or cotton, you may need to wash and dry it beforehand. Jute and synthetic fibers do not require pre-washing. You will also need to cut your material into strips of equal width and length. The width of the strips will determine the thickness of your rug, so choose accordingly.
Choosing Your Design
Before you start weaving your rug, you need to decide on your design. You can create a simple striped pattern or a more complex design using different colors and textures. You can also use stencils or templates to create a specific shape or image. Sketch out your design on graph paper to get an idea of how it will look before you start weaving.
Preparing Your Loom
A loom is a tool used to hold your rug in place while you weave. You can either purchase a loom or make one yourself using a wooden frame and nails. Once you have your loom, you need to prepare it by attaching your warp threads. Warp threads run vertically on your loom and act as the foundation for your rug.
Weaving Your Rug
Now it’s time to start weaving your rug. You will use your weft threads, which run horizontally, to create the pattern of your rug. You can weave your rug using a variety of techniques, such as plain weave, twill weave, or soumak weave. Follow your design closely and make sure to keep the tension even throughout your rug.
Finishing Your Rug
Once you have finished weaving your rug, it’s time to remove it from the loom. Cut your warp threads and tie them off securely. You may need to trim any excess material from the edges of your rug and add fringe if desired. Give your rug a final brush or shake to remove any loose fibers.
Caring for Your Rug
To keep your rug looking its best, it’s important to care for it properly. Vacuum your rug regularly to remove dirt and debris. Spot clean any spills or stains with a mild detergent and water. Avoid exposing your rug to direct sunlight or moisture, as this can cause fading and damage.
Conclusion
Making a rug is a fun and rewarding project that can add warmth and style to your home. With the right materials and instructions, anyone can create a beautiful and unique rug that will be cherished for years to come. Whether you choose to make a simple striped rug or a complex design, the process of rug making is a true art form.
Gathering Supplies: A Primer on What You’ll Need
Before embarking on your rug-making journey, it’s important to gather all the necessary supplies. These include a loom, yarn, scissors, measuring tape, and a needle. It’s also helpful to have a pattern or design in mind to guide your weaving. You may want to invest in a rug hook or shuttle to aid in the process as well.
Choosing Your Yarn: Quality Over Quantity
When selecting yarn for your rug, it’s important to prioritize quality over quantity. Opt for durable, sturdy materials that will withstand wear and tear. Wool is a popular choice due to its strength and resilience, but cotton and synthetic materials can also be used. Consider the texture and color of your yarn, as it will play a crucial role in the final aesthetic of your rug.
Cutting the Loom: Getting the Perfect Size
Before beginning your weaving, you’ll need to cut your loom to the desired size of your rug. Measure the length and width you want your rug to be, and cut your loom accordingly. Be sure to leave extra space around the edges to allow for securing the edges later on.
Planning Your Design: Tips for Finding Your Inspiration
Designing your rug can be both exciting and challenging. Look for inspiration in nature, geometric shapes, or even existing patterns. Sketch out your design beforehand and experiment with different color combinations to find the perfect match for your space.
Preparing Your Weave: The Importance of an Even Base
Before beginning to weave, it’s important to create an even base. This involves tying your yarn onto the loom and creating a taut, straight line. Use a comb or other tool to ensure the yarn is evenly spaced and free of any bumps or knots. This will provide a solid foundation for your rug.
Getting Started: Tying Your Knots
Once your base is established, it’s time to start weaving. Begin by tying a knot at one end of your loom and passing the yarn over and under each strand until you reach the other side. Repeat this process, alternating over and under with each row. Be sure to keep your tension consistent throughout the weaving process.
Rhythm and Pace: Developing Your Weaving Technique
Weaving can be a time-consuming process, but it’s important to find a rhythm and pace that works for you. Experiment with different techniques, such as looping or braiding, to create texture and interest in your rug. Take breaks as needed to avoid hand fatigue and maintain focus.
Adding Texture: Incorporating Interesting Elements into Your Rug
As you weave, consider adding texture and interest to your rug. This can be done through incorporating different materials, such as ribbon or leather strips, or by using different weaving techniques. Creating a varied surface will add depth and dimension to your rug.
Finishing Touches: Securing Your Edges
Once you’ve completed your weaving, it’s time to secure the edges. This involves tying off the ends and trimming any excess yarn. You may want to add a border or fringe to complete the look. Use a needle and thread to sew any loose ends and ensure the edges are secure.
Cleaning and Maintenance: Caring for Your Handmade Creation
With proper care and maintenance, your handmade rug can last for years to come. Vacuum regularly to avoid dirt and dust buildup, and spot clean any stains as needed. Consider having your rug professionally cleaned every few years to maintain its quality and appearance.
Making a rug is a traditional craft that has been passed down for generations. It involves weaving or knotting fibers together to create a beautiful and functional piece of home decor. While making a rug can be a rewarding experience, it also has its pros and cons.Pros:1. Personalization: Making your own rug allows you to customize it to your exact specifications. You can choose the colors, patterns, and size that best fit your home decor.2. Cost-effective: Depending on the materials you choose, making a rug can be a cost-effective option compared to purchasing a pre-made rug.3. Skill development: Rug-making requires patience and skill, which can be developed with practice. It is a great way to exercise your creativity and improve your hand-eye coordination.Cons:1. Time-consuming: Making a rug is a time-consuming process that requires a significant amount of patience and dedication. Depending on the size and complexity of the rug, it can take weeks or even months to complete.2. Equipment and materials: Rug-making requires specialized equipment and materials that can be expensive to purchase. This can make it difficult for beginners to get started.3. Physical strain: The process of weaving or knotting fibers together can be physically demanding. It can lead to back pain, neck pain, and other discomforts if proper posture and ergonomics are not maintained.In conclusion, making a rug can be a fulfilling and satisfying experience if you have the time, patience, and dedication to see it through. While there are some downsides to this craft, the benefits of personalization, cost-effectiveness, and skill development may outweigh the cons.
As a journalist, I find it fascinating how we can create beautiful and functional items with just a few materials and some creativity. One such item is a rug, which not only adds warmth and comfort to any room but also serves as a statement piece. In this blog post, we’ll explore how you can make your own rug without needing any special skills or tools.
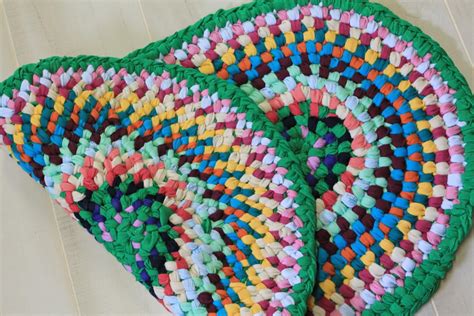
Firstly, let’s talk about the materials you’ll need. You’ll require a non-slip rug pad, fabric strips, scissors, and a ruler. The fabric strips can be made from old clothes, sheets, or even purchased from a store. The width of the strips should be around 1.5 inches, and the length will depend on the size of the rug you’re making. Once you have all the materials, you can start by cutting the rug pad to the desired size and shape. It’s best to use a ruler to ensure precise measurements and avoid any uneven edges.
Next, take one of the fabric strips and tie it onto one end of the rug pad. Then, twist the strip and tie it onto the next section of the rug pad. Continue doing this until you’ve covered the entire rug pad, making sure to alternate colors and patterns to create a unique look. Once you’ve completed the first layer, you can start on the second layer by tying another fabric strip onto the first layer’s knots. Repeat this process until you’ve reached your desired thickness and tassel length. Finally, trim any excess fabric and give your rug a good shake to remove any loose threads.
In conclusion, making your own rug is a fun and rewarding project that doesn’t require any special skills or tools. By using simple materials and following the steps outlined above, you can create a beautiful and functional rug that will add warmth and style to any room in your home. So why not give it a go and see what kind of rug you can create!
Video how to make a rug
Visit VideoAs a journalist, I have come across many people who are interested in making their own rugs. Here are some of the most common questions people ask about rug making:
1. What materials do I need to make a rug?
- The first thing you will need is a rug frame or loom. This will hold the rug in place as you weave it.
- You will also need yarn or other materials to weave with. Wool is a popular choice for rugs, but you can also use cotton, jute, or other fibers.
- A shuttle or needle will be necessary to weave the yarn through the rug.
2. How do I start making a rug?
- First, you will need to set up your rug frame or loom and attach the warp threads. These threads will form the base of the rug and provide structure for the weaving.
- Next, you will begin weaving the weft threads through the warp threads, using a shuttle or needle to create a pattern or design.
- Continue weaving until the rug is the desired size, then tie off the ends and remove it from the loom.
3. Can I make a rug without a loom?
Yes, it is possible to make a rug without a loom. One method is to use a latch hook, which allows you to pull strips of fabric or yarn through a mesh canvas. Another option is to use a rug hooking tool, which works similarly but creates loops instead of knots.
4. How long does it take to make a rug?
The time it takes to make a rug will depend on the size and complexity of the design, as well as your level of experience. A small, simple rug may only take a few hours to complete, while a larger, more intricate design could take several weeks or even months.
5. Are there any tips for making a rug?
- Choose a simple design for your first rug to build your skills.
- Use materials that are easy to work with and won’t fray or unravel easily.
- Take breaks often to prevent eye strain and hand fatigue.
- Don’t be afraid to experiment with different colors and textures to create a unique look.
With these answers, I hope to have provided helpful information to those interested in making their own rugs. Happy weaving!